How to Deploy a Dockerized Node.js (TypeScript) Application to Amazon EC2 Service — 2023


1. Introduction
There are several options available once you’ve created a web application to publish it online and make it accessible to others. Elastic Compute Cloud, a well-known service, is one of the platform’s offerings from Amazon Web Services (AWS) (EC2).
It’s important to have a basic grasp of EC2 and how to deploy it because it forms the foundation for many of AWS’ other services.
In this article, we’ll learn how to set up an EC2 instance, configure it, and deploy a straightforward Node.js application to it. Your Node project will be operating on AWS by the conclusion of this tutorial, and you’ll have a better grasp of how to connect with a fundamental system of AWS.
2. Prerequisites
To follow through this tutorial, you’ll need the following:
- An AWS Account
You can check out this tutorial on how to create an AWS account.
- Node and Npm
You need to have Node and Npm installed on your computer. You can install them here .
- Docker
Docker is a very lightweight virtual machine that comes with all the applications and dependencies needed to run your program. Docker allows us to group our programs into manageable parts that may be run everywhere Docker is deployed. This eliminates the excuse “but it works on my computer!”
Since i won’t be going into great detail, this tutorial will presume a basic understanding of Docker. If you want to learn more about docker, I’ll create an article very soon where i’ll teach you how to use docker for production-ready applications.
Now, make sure you have docker downloaded on your machine. You can download here.
- Node Application
You need a server application running. Let’s quickly set up a node application.
Open the terminal and run:
mkdir node-ec2
cd node-ec2
npm init --yes
Next, let’s install express and typescript.
npm install express --save
npm i -D typescript @types/express @types/node ts-node
Generate a tsconfig.json:
npx tsc --init
Go to the package.json file once these libraries have been installed to see a new dev dependencies object and also update it to have the build and start script:
{
  "name": "node-ec2",
  "version": "1.0.0",
  "main": "index.ts",
  "scripts": {
    "build": "tsc --project ./",
    "start": "npm run build && node build/index.js"
  },
  "license": "MIT",
  "dependencies": {
    "express": "^4.18.2"
  },
  "devDependencies": {
    "@types/express": "^4.17.15",
    "@types/node": "^18.11.18",
    "ts-node": "^10.9.1",
    "typescript": "^4.9.4"
  }
}
Open your prefered editor to create an index.js file to setup Express and define a request handler.
import express, {Express, Request, Response} from "express";
const app: Express = express();
const port = 8080;

app.get('/status', (req: Request, res: Response) => {
    res.send({status: "Server is healthy!"});
});

app.listen(port, () => {
    console.log(`App is running at http://localhost:${port}!`)
});
We can start up the server by running:
npm start
When we navigate to http://localhost:8080/status, we ought to receive a response with the status “Server is healthy!” As soon as that succeeds, be careful to shutdown the server by pressing CTRL+C.
Let’s create a Docker image of our straightforward Node application so that it can be deployed to EC2.
3. Dockerizing our Node Application
Create a file and name it Dockerfile
FROM node:16-alpine

WORKDIR /usr/src/app

COPY package*.json ./

RUN npm install

COPY . .

RUN npm run build

EXPOSE 8080
CMD [ "node", "build/index.js" ]
We can use the above docker script for simple node applications. Now let’s build the docker image using the command below:
docker build . -t node-ec2
docker run -p 8080:8080 node-ec2
If you navigate to http://localhost:8080/status, we ought to receive a response as before. Now shut down the server by pressing CTRL+C.
Finally, let’s push our docker image to Docker Hub:
docker login # Enter your Docker Hub credentials here
docker tag node-ec2 <YOUR_DOCKER_USERNAME>/node-ec2
docker push <YOUR_DOCKER_USERNAME>/node-ec2
Deployment to EC2
Now that we’ve dockerized our application, we need to set up an ec2 instance for it to run on.
Head over to AWS and sign in.
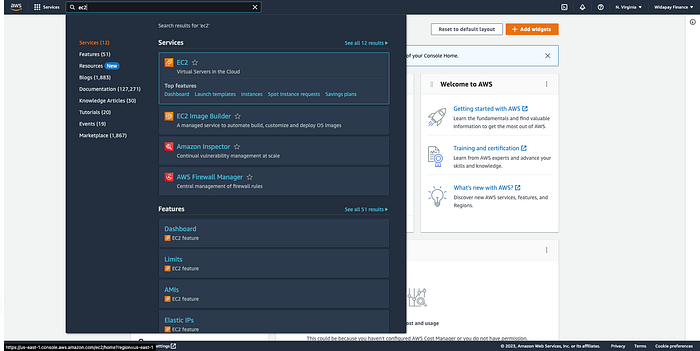
On the navigation bar, click on the search box, and search for EC2.
You should see something similar to this:
On you open up the EC2 page, you’ll have a page that looks like this:
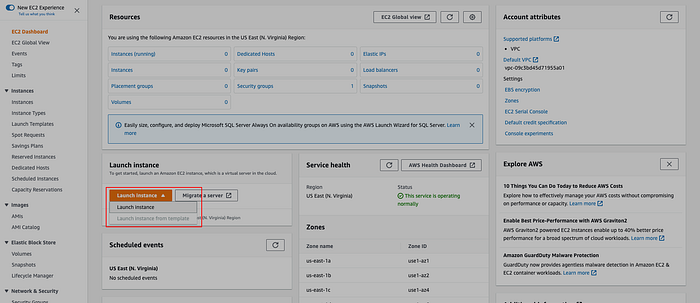
Click on Launch Instance.
On the next page, you should have a view like below:
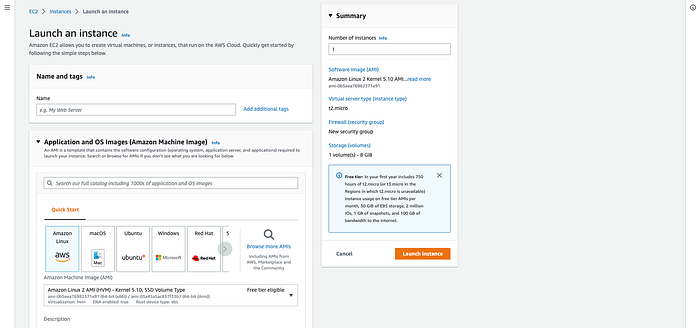
AMIs
Here is where we choose the AMI, short for Amazon Machine Image. An AMI is a server that may be purchased in a variety of configurations.
For instance, we might choose an Amazon Linux 2 AMI, or if you scroll down, you’ll find other instances with Ubuntu running on them.
Each AMI is a copy of a machine’s operating system and possibly some other software that has been frozen.
Click on Browse more AMIs to view the list of several AMIs available.
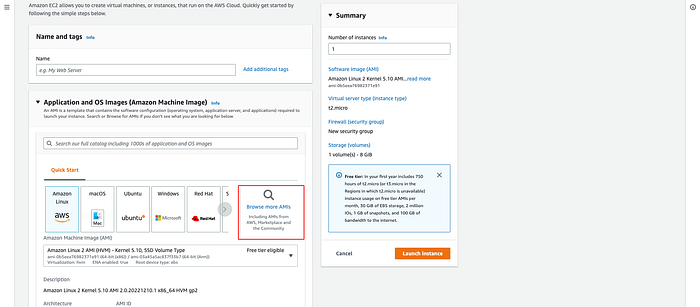
To make things simple, we can utilize this to create an EC2 instance that is already set up using Docker!
To do this, we need to click “AWS Marketplace AMIs” on the left and then type “ECS” into the search bar. Several results ought to come up, however, we want the “ECS Optimized Amazon Linux 2” image.
This image, which includes Docker, is designed specifically for running containers. The next page will open after you click “Select” on the selected picture:
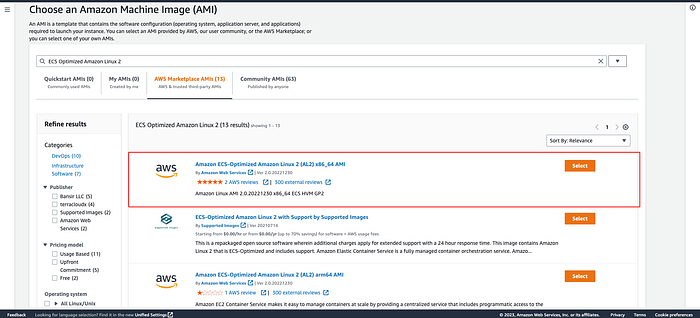
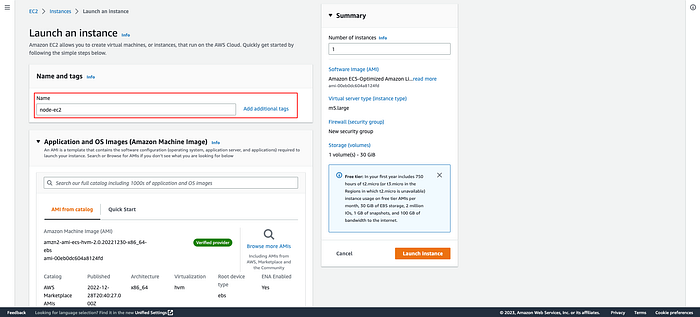
After clicking Select, a pop up will show, then you’ll click on Continue.
Enter your instance name. For example, node-ec2.
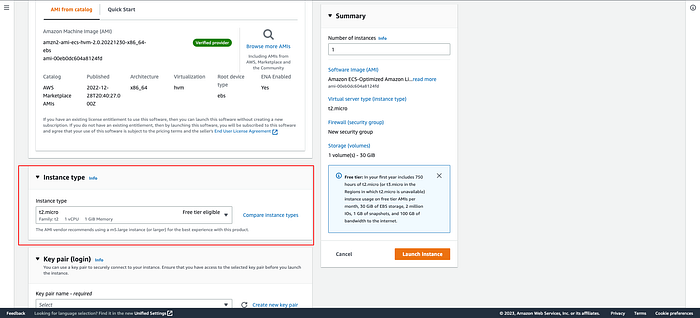
Instance Types
We decide what kind of instance we want on the next view. In general, this determines the resources that will be made available to the server that we’re launching, with scaling fees for machines with higher performance.
Scroll down the page to select the instance type — It is advised to utilize the t2.micro instance type since it qualifies for the free tier:
Key Pair
You must create a key pair before launching the application to be able to access it.

Click on create key pair and you should have a pop-up like the one below:
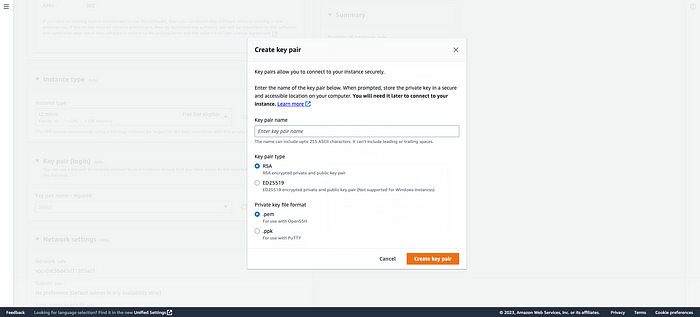
Enter your key pair name. Leave the Private key file format as .pem. Once you click on Create key pair, It will be downloaded automatically.
Network Settings (Security Group)
This signifies that any traffic utilizing the TCP protocol that enters through port 22 is permitted (0.0.0.0/0 denoting any location). To enable everyone to use our app at port 8080, we must add one more rule.
Make sure you select the check boxes for allowing Http and Https from anywhere.
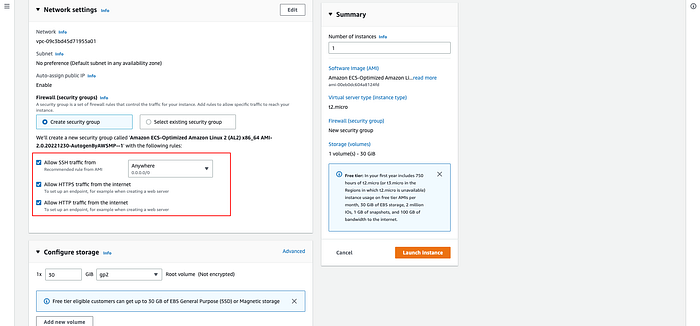
Note: There are some other advanced configurations that you can set up depending on your app needs. We don’t need to do that for now.
You can now go ahead to launch the instance.

On the next page that shows, please wait patiently for the instance to be launched successfully.
Once the instance is launched successfully, you’ll see a page like the one below:

Click on the Instance Id.
Connecting to Your EC2 Instance
Once you click on the Instance Id, a new tab is open and you see a page like this:

Click on the check box to view the instance details. In the section below, copy the Instant Public Ipv4 address.
Now, go to your computer terminal and enter the following commands:
chmod 400 <NAME_OF_KEYPAIR_FILE>
ssh -i <NAME_OF_KEYPAIR_FILE> ec2-user@<PUBLIC_IPV4_ADDRESS>
Once you’re logged into the server, enter the docker command below:
docker run -p 8080:8080 <YOUR_DOCKER_USERNAME>/node-ec2
Note: For M1 Mac users, you might experience an error like this:
WARNING: The requested image's platform (linux/arm64/v8) does not match the detected host platform (linux/amd64) and no specific platform was requested
exec /usr/local/bin/docker-entrypoint.sh:
Just run the docker command like below:
docker run --platform linux/amd64 -d -p 8080:8080 <YOUR_DOCKER_USERNAME>/node-ec2
You should have your app running successfully by now. You’ll be able to reach the instance using the same address you used to SSH into the instance. Simply navigate in your browser to:
<Public_Ipv4_Address>:8080/status
Security
When it comes to securing your EC2 instance, there are several measures you should put in place.
Using a .pem file: A .pem file allows you to be able to authenticate to the instance directly without public access.
Checking the security groups: You can make your instance available only via SSH or HTTPS protocol.
There are other measures to put in place for securing our instance, but that’ll be a separate tutorial for now.
Other AMIs
There are hundreds of different AMIs, many of which come from different communities and have pre-installed applications. It’s worth looking through them to see if there’s a simple method to set up anything you’ve wanted to work with.
Adding a Custom Domain
You might want to create a domain name and direct it to your application now that it is operating on a server.
Conclusion
Since RDS (AWS’ database service) is essentially simply highly optimized EC2 instances with a lovely dashboard, EC2 is the backbone of many AWS services.
Understanding this foundational tool in AWS’ armory will inevitably lead to the discovery of fresh ways to carry out concepts.
In this article, we’ve used Express to build a straightforward Node.js application, dockerized it, set up EC2 for deployment, and then deployed it to the EC2 instance.
If you want to learn how to architect an EC2 instance, with load balancers, docker and Amazon RDS, I’ll be uploading another tutorial next week.
Kindly follow to stay updated on my latest tutorials.
Cheers! 🥷🏻
#docker #nodejs #ec2 #express #typescript